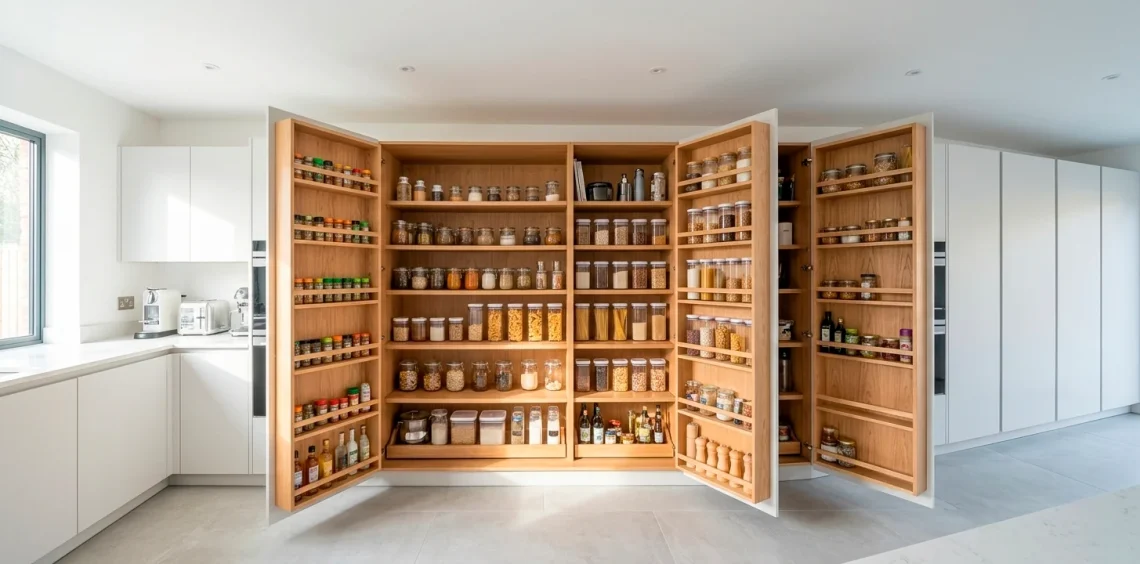
Stop playing Tetris with your spice jars! If you’re tired of losing a can of beans to the dark abyss of a deep shelf, a fold-out system is your new best friend. It’s the ultimate space-saving magic trick for tiny kitchens. Let’s build something that actually makes sense for your snacks and sanity. Ready to finally see everything you own?
The Golden Rule: Measure Twice, Cry Once
Before you start swinging a hammer, you need to know exactly how much space you’re working with. Seriously, grab a tape measure and be honest with yourself about that tiny nook. Are you dealing with a standard cabinet or a weirdly deep recess? Precision is your best friend here because a fold-out system depends entirely on clearance. If you miscalculate by even a quarter inch, your fancy new doors will just jam against the frame. Ever tried to force a door that’s just a hair too wide? It’s a special kind of frustration 🙄. Measure the height, width, and depth of the interior space, then subtract an inch for ‘breathing room’ so the hinges can actually do their job without scratching your paint job.

Gather Your Building Squad
Now for the fun part: spending money at the hardware store. You want 3/4-inch plywood for the main frames and something lighter, like 1/2-inch, for the fold-out door shelves. Don’t cheap out on the wood; warped boards are the enemy of smooth operation.
Essential building supplies:
- Furniture-grade plywood sheets
- Wood glue
- Pocket hole screws
- Sandpaper (120 and 220 grit)
Also, pick up some heavy-duty piano hinges. These run the full length of the door and distribute weight much better than individual butt hinges. Trust me, once you load those shelves with jars of pasta sauce, you’ll be glad you went for the sturdy option. IMO, the extra ten bucks now saves you a sagging door later.

Crafting the Inner Frame
Building the inner frame is like making a giant shadow box. You’re essentially creating a second set of shelves that sit inside your existing pantry, but with enough gap for the outer layers to fold in. I usually assemble the outer box first using pocket holes because they’re strong and hidden.
Ever noticed how much weight a simple wood joint can hold when it’s glued properly? Never skip the wood glue. It’s the secret sauce that keeps the whole structure from wobbling like a jelly mold after a month of use.

Designing Shelves That Don’t Fail
Let’s talk about the ‘lips.’ You need a small rail or a raised edge on every single fold-out shelf. Why? Because the moment you swing that door open, physics will try to dump your expensive organic honey right onto the floor. 🍯
I like using thin strips of pine for this. It looks sleek and keeps everything in its place.
Shelf lip specs:
- Front lip height: 1.5 inches
- Side support thickness: 0.5 inches
- Shelf depth: 3-4 inches
Keep the spacing between shelves varied. You don’t need the same clearance for a tiny spice jar as you do for a giant box of cereal. Plan your heights based on your actual groceries, not some imaginary ‘standard’ size. It’s your pantry, after all!

The Art of the Piano Hinge
Mounting the piano hinges is the moment of truth. Aligning a five-foot metal strip while holding a heavy wooden door is basically a gym workout. If you have a friend nearby, bribe them with pizza to hold the door steady while you drive the screws.
Are you worried about the weight? You should be! Always screw into the studs or at least use massive heavy-duty anchors if you’re mounting to the wall. A fully loaded fold-out pantry can easily weigh 50 pounds, and you don’t want that crashing down during your midnight snack run. If you want a more styled look for your kitchen, check out this botanical green kitchen aesthetic guide for color ideas.

Magnetic Power for the Win
Magnetic catches are the unsung heroes of this project. Without them, your fold-out doors might slowly creep open like a scene from a haunted house movie. Install a strong magnet at the top and bottom of each wing to keep them snapped shut. This prevents sagging and ensures a flush finish when the pantry is closed. It feels surprisingly satisfying to hear that solid ‘click’ every time you put the groceries away.

Sand, Paint, and Repeat
Sanding is boring, I get it. But do you really want a splinter every time you reach for the crackers? Spend thirty minutes with a 220-grit block until the wood feels like butter.
As for the finish, go for a semi-gloss or high-gloss paint. Why? Because pantries get messy. Flour spills, honey drips, and oil happens. A glossy surface lets you wipe away the chaos with a damp cloth in five seconds.
If you’re feeling adventurous, add a pop of color to the inside of the fold-out panels. It’s a fun surprise every time you open it! For more tips on making your storage look like a designer masterpiece, you should definitely browse these bold maximalist pantry organization patterns.

The Ultimate Organization Strategy
Clear bins are a total game changer for these shallow shelves. Since the fold-out sections are usually only 3-4 inches deep, you can see everything at a glance. No more digging through three rows of cans to find the chickpeas!
Heading phrase for organization:
- Transparent acrylic spice jars
- Chalkboard labels for bulk items
- Wire baskets for heavier snacks
Group things by ‘vibe’—baking on one side, snacks on the other. It makes life so much easier when you’re in a rush. Labels aren’t just for ‘Pinterest moms’; they actually help you stop buying duplicates of stuff you already have hidden in the back. Ever bought a third jar of cumin? Yeah, me too.

Hanging the Heavyweight
If you’re mounting this directly to a wall rather than inside a cabinet, you need to be extra careful about the structural integrity. I recommend a ‘French Cleat’ system for the main box. It distributes the weight across a wider area and makes it way easier to level. Plus, it feels incredibly secure. Don’t trust small brackets for a project this massive; go for the heavy hitters.

Don’t Overload the Wings
Let’s be real: we all want to cram as much as possible into our new toy. But remember that every ounce counts against your hinges. Keep the heavy glass jars and giant flour sacks in the static back section.
Use the fold-out wings for the light stuff—spices, tea boxes, and those half-eaten bags of chips. This keeps the center of gravity closer to the wall and saves your hardware from premature failure.
Check the screws every few months just to make sure nothing is loosening up. A quick turn of the screwdriver is all it takes to keep your pantry swinging smoothly for years. Who knew being organized could feel this professional? 😎

The Final Verdict
Building a fold-out pantry is the ultimate weekend win for any small kitchen owner. You’ve turned a cluttered mess into a streamlined storage machine. Now, go fill those shelves and enjoy seeing your snacks again! Which part are you organizing first? Let me know in the comments—I’m a sucker for a good spice rack reveal!