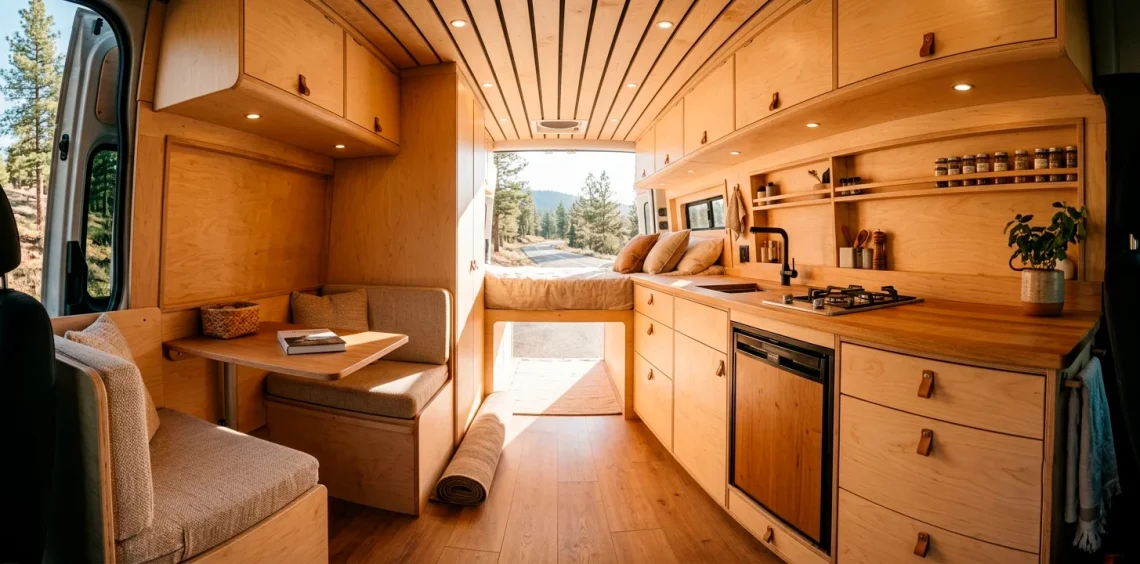
Sick of seeing perfect van builds on social media and wondering how they actually keep their cabinets from rattling apart on a dirt road? I felt the exact same way before I tackled my first rig. Building custom cabinetry for a van is a whole different beast than slapping some cheap shelves against a wall. Let’s build something that actually lasts.
The Blueprint Phase
You cannot skip the planning phase when you build a home inside a metal box. Vans taper, curve, and twist, meaning a standard square cabinet simply won’t fit. I spent days just staring at my empty cargo space before making a single cut. Grab a scribe tool and some cardboard to map out those weird wall contours right now.
Trust me, template making is your best friend. Cut your cardboard shapes, fit them against the van ribs, and trace them onto your wood. Ever tried forcing a perfectly straight board against a curved Sprinter wall? It ends in tears and wasted plywood. Take your time here.

Choosing Your Lumber
Not all wood belongs in a moving vehicle. You need something lightweight but tough enough to handle constant road vibrations. Baltic birch plywood is the gold standard for van cabinetry. I personally use half-inch thickness for the main boxes and quarter-inch for the backing to keep the overall weight down. Avoid MDF at all costs—unless you want your cabinets to disintegrate the second they encounter high humidity. Solid wood looks amazing, sure, but it adds unnecessary weight that ruins your gas mileage. Stick to high-quality plywood and thank yourself later.

Framing Basics
Now we get to the fun part. Framing sets the exact skeleton for your entire van build. You have two main routes here: framing with standard dimensional lumber or building frameless European-style boxes.
I prefer the frameless method because it maximizes every inch of storage space inside the cabinet. Every millimeter counts when you live in eighty square feet. You simply join your plywood panels directly together using pocket holes or dado joints.
If you decide to use pocket holes, grab a high-quality pocket hole jig. It makes creating strong, hidden joints incredibly easy. Add a little wood glue before you drive the screws in, and those joints will survive the bumpiest backcountry roads you can find.

The Hardware Reality Check
Let me save you a massive headache right now: buy heavy-duty hardware. Standard kitchen drawer slides will fly open when you take a sharp left turn. Soft-close, heavy-duty drawer slides with a locking mechanism are non-negotiable for a mobile home. You absolutely need your pots and pans to stay put while driving.
Essential van hardware list:
- Soft-close locking drawer slides
- Gas strut hinges for overheads
- Push-button latches for doors
The same rule applies to your hinges. Invest in quality strut hinges for your upper cabinets so they stay open while you grab your coffee beans. Slamming your head into a falling cabinet door at 6 AM is nobody’s idea of a good time, IMO. 😅

Building the Carcasses
Assembling the cabinet boxes—or carcasses—requires absolute patience and a very flat work surface.
Start by cutting all your panels to exact dimensions. A track saw makes this process infinitely easier than wrestling large sheets of plywood through a tiny table saw.
Assemble your boxes using the pocket holes we discussed earlier. Keep checking for square after every single screw. If your box goes out of square right now, your cabinet doors will never align properly later.
Corner clamps act as absolute lifesavers during this step. They hold the pieces perfectly at 90 degrees while you drive the screws home. You want these boxes rigid and solid.

Face Frames vs. Edge Banding
Once you build your boxes, you have to hide the ugly plywood edges. You can either attach a solid wood face frame or use iron-on edge banding. Edge banding offers a sleek, modern look and literally irons right onto the exposed plywood edges. A solid face frame requires more work but adds significant structural rigidity to the front of your cabinets. I went with edge banding on my first build because it felt faster, but I actually prefer the durability of a hardwood face frame now. Choose the method that fits your aesthetic and timeframe.

Customizing the Countertop
You cannot have gorgeous base cabinets without a stellar countertop that ties the whole kitchen together.
Butcher block remains a massive favorite in the van life community because it adds incredible warmth to an industrial space. However, remember that solid wood gets heavy quickly. If weight is a major concern, consider building a lightweight laminate countertop over a hollow plywood core.
I personally prefer a thin oak butcher block; you just have to compensate for the weight elsewhere in your build. Sand it down and treat it with a food-safe mineral oil for a gorgeous, water-resistant finish.

Finishing and Protecting
Vans experience wild temperature swings and crazy humidity levels throughout the year. You must seal every inch of your wood. Leaving raw wood inside a van guarantees warping and mold within a few months, completely ruining your hard work.
Sand everything up to 220 grit until it feels perfectly smooth to the touch. I highly recommend applying a high-quality water-based polyurethane. It dries extremely quickly, doesn’t yellow over time, and provides a tough, wipeable surface. Apply at least three thin coats, lightly sanding between each one.

Anchoring to the Van
Your beautiful cabinets mean nothing if they become dangerous projectiles during a sudden stop. Securing them safely to the van structure is the most critical step of the entire build. Never anchor cabinets to the plywood floor alone. You must secure them to the metal ribs of the van walls using plus nuts or rivet nuts. These magical little fasteners provide secure, threaded mounting points directly in the sheet metal. Use strong L-brackets and heavy-duty bolts to connect the cabinet carcasses safely. I usually add a dab of thread locker to the bolts to ensure the road vibrations never shake them loose. Need inspiration on how to make a tight space feel amazing once it’s all bolted in? Check out this guide on small space magic vibrant camper van interior.

Lighting and Final Touches
Don’t forget to wire up your lighting before you permanently mount everything! Running LED strip wires behind the cabinets hides the mess and gives you that high-end, custom look.
I always route a small channel underneath my upper cabinets specifically for warm white LED strips. It illuminates the countertop perfectly for late-night cooking sessions. Add some stylish, rattle-free push-button latches to your doors, and your custom van kitchen is officially ready for the wild.

Conclusion
Building custom van cabinetry definitely tests your patience, but nothing beats the feeling of cooking a meal in a kitchen you built entirely from scratch. Stick to high-quality plywood, invest in heavy-duty hardware, and measure everything twice. The open road is calling, and your dream rig is finally coming together! Which cabinet section are you tackling first? Let me know in the comments below!