Forget the overpriced store-bought bouquets that wilt in three days. This Mother’s Day, you can give your mom a piece of everlasting spring by crafting a gorgeous botanical pressed flower frame. It is easier than it looks, insanely budget-friendly, and packed with sentimental value. Grab your favorite blooms, and let us turn nature into art!
Why Pressed Flowers Beat Traditional Bouquets
Why spend fifty bucks on a floral arrangement that turns into brown sludge by Tuesday? Pressed flower frames freeze nature in time, giving Mom a permanent reminder of your favorite memories together. I made one for my own mother three years ago using fern fronds from our favorite hiking trail, and she still brags about it to every guest who walks through her front door. It is a thoughtful, sustainable alternative that screams effort without requiring an art degree. Plus, preserving botanicals gives your gift a vintage, custom aesthetic that money simply cannot buy at a standard florist shop.

Foraging and Selecting the Best Blooms
Ever wondered why some blooms press into gorgeous paper-thin specimens while others turn into moldy disasters? The secret lies in anatomy and moisture content.
Always hunt for naturally flat flowers with single-layer petals. Pansies, violas, daisies, and delicate fern fronds are absolute superstars for beginners. You will want to avoid bulbous flowers like traditional roses or carnations unless you pull the petals apart individually first.
Head out to your garden or a local meadow after the morning dew evaporates completely. Harvesting dry botanicals prevents unsightly browning and rot during the preservation stage. Trust me, nobody wants to frame a fuzzy, moldy dandelion for Mother’s Day! 🌸

Mastering the Pressing Process
Once you gather your floral bounty, you need to flatten those beauties immediately. You can invest in a wooden flower press, but a heavy stack of old encyclopedias works just as well. Place your blooms between two sheets of parchment or absorbent blotting paper, ensuring they do not touch each other.
Patience is your absolute best friend during this phase. Stack heavy weights on your books and walk away for at least ten days. Resist the urge to peek early! Opening the pages too soon disrupts the drying process and can tear delicate petals right in half. Good art takes time, FYI.

Choosing the Perfect Floating Frame
Now comes the fun part: picking the vessel for your artwork. Traditional frames with cardboard backing can look a bit dated and flat.
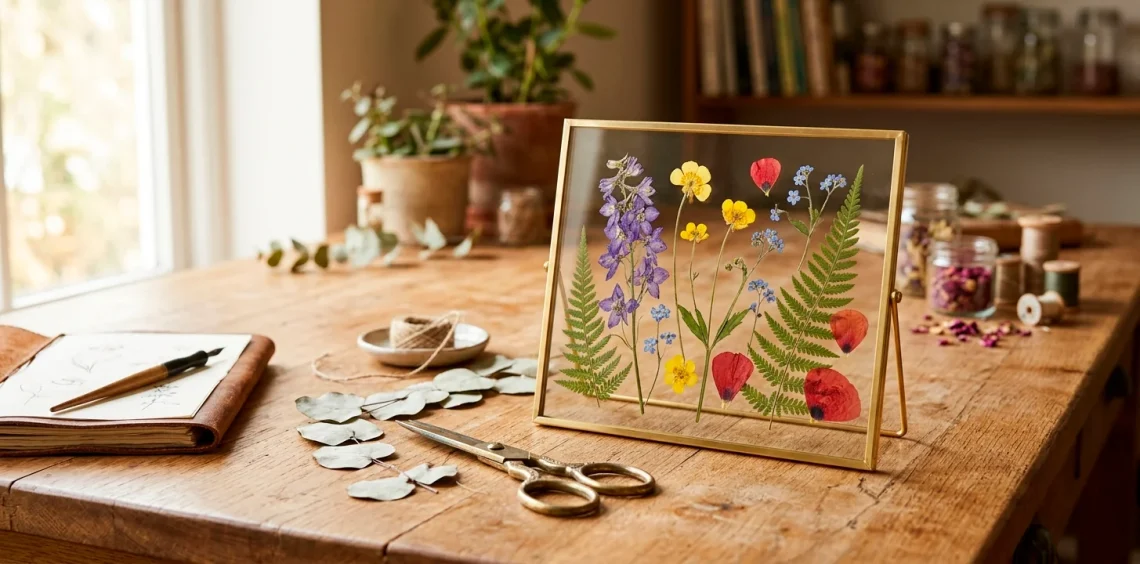
Floating frames with double glass panes create a mesmerizing, transparent effect. They allow natural light to pass directly through the translucent petals, making the colors pop against your wall.
You can choose between sleek modern metallic finishes or warm, rustic woods. I personally adore antique brass edges because they give off a charming, Parisian flea-market vibe that moms totally swoon over.
Just ensure the hinge mechanism is tight enough to clamp the botanicals firmly in place without sliding around!

Designing Your Botanical Layout
Before you drop your flowers onto the glass, step back and channel your inner graphic designer. Do not just dump petals randomly and hope for the best! Play around with different layouts on a clean sheet of white paper first.
Embrace negative space to let each individual bloom breathe and shine. You can arrange stems to mimic a miniature growing wildflower meadow, or create a delicate circular wreath design. Try placing a large, bold focal flower slightly off-center and framing it with wispy green fern fronds for an effortlessly balanced, professional gallery look.

The Glue vs. Gravity Debate
To glue or not to glue? That is the ultimate crafter’s dilemma. If your floating frame has a super tight clamp, the pressure of the two glass panes alone will hold your botanicals securely in place forever. However, if your frame is slightly loose, gravity will quickly ruin your masterpiece once you hang it up. Use a toothpick to apply a microscopic dot of clear-drying PVA glue to the back of thicker stems. Less is definitely more here! You want just enough tack to prevent sliding, without any messy globs oozing out onto the pristine glass.

Assembling and Sealing Your Masterpiece
Cleanliness is next to godliness when it comes to glass framing. Even the most stunning floral layout will look amateurish if rogue thumbprints and stray cat hairs surround your clean petals.
Clean both glass panes thoroughly with lint-free microfiber cloths and rubbing alcohol. Wear disposable nitrile gloves during this step if you want to be a true perfectionist.
Gently lower the top glass pane directly downward over your arranged flowers without sliding it sideways. Secure the latch, wipe the exterior edges one last time, and behold your gorgeous creation! You just built an heirloom-quality botanical display from scratch.

Adding Sentimental Touches Mom Will Love
Want to guarantee happy tears this Mother’s Day? Take your frame to the next level by weaving in deeply personal elements.
Incorporate flowers from her specific birth month or your childhood garden. You can also use a gold paint pen to write a short, heartfelt message or date directly onto the glass. Another sweet trick involves slipping a small vintage photograph of the two of you right among the dried leaves. These bespoke touches transform a pretty decor piece into an unforgettable emotional treasure. For even more inspiration on showcasing family treasures around the house, check out our guide to serene Mother’s Day mantel styling.

Troubleshooting Common Framing Fails
Even seasoned crafters run into hiccups sometimes. Did your vibrant petals fade to a dull brown after a few weeks? IMO, moisture and direct sun usually trigger rapid fading.
To keep your artwork looking crisp for decades, follow these rescue remedies.
Essential troubleshooting tips:
- Keep out of direct sun: Hang your frame on a shaded wall to prevent UV discoloration.
- Use silica gel packets: Store your press with silica beads to absorb stubborn moisture before framing.
- Fixing slippage: If flowers slide after hanging, reopen your frame and add a tiny dot of craft glue.
Do not stress over minor imperfections, because natural art should look organic!

Displaying and Caring for the Artwork
Now that your masterpiece is complete, you need to find its forever home! Hang your pressed flower frame in a cozy reading nook or prop it on a bedroom shelf where Mom can admire it every morning. When cleaning the display during weekly chores, never spray glass cleaner directly onto the frame. Liquid can seep through the tiny edge gaps and ruin the delicate dried botanicals instantly. Instead, spray your cloth first and wipe the exterior surface gently. If you want to expand your indoor greenery even further, read our guide to lush botanical decor for the modern home.

Conclusion
Crafting a botanical pressed flower frame is the ultimate way to show your appreciation this Mother’s Day. You turn fleeting seasonal blooms into a permanent symbol of love that elevates any home decor. Which flower varieties are you grabbing first for your custom design? Share your thoughts and let me know in the comments below! Happy crafting! ✨