Hard truth: your standard armchair just isn’t cutting it for those weekend marathon reading sessions anymore. We all want that picture-perfect, deeply comfortable corner where the rest of the world just completely fades away. Luckily, you can easily build your own personal sanctuary without spending a fortune. This DIY floor pillow tutorial will transform any unused corner into the ultimate cozy reading nook you deserve.
Location Is Everything
First, scout your home for the perfect hidden gem of a spot. I love using an underutilized bedroom corner or a deep window alcove. You want a low-traffic area where you can abandon your responsibilities in peace.
Look for natural light during the day. Is there an empty space under a window whispering your name? Grab it before someone else does. For more inspiration on transforming small spaces, check out our guide to creating cozy hygge home library.

Choosing Your Fabric Wisely
Let’s talk fabric, because nobody wants a scratchy pillow ruining their next big plot twist. You need something durable yet incredibly soft. I highly recommend heavy-duty cotton canvas, rich velvet, or thick linen blends. Think about your lifestyle before buying. If you have pets, avoid delicate weaves unless you enjoy vacuuming fur out of your decor daily. Choose a color that grounds your space, like warm terracotta or deep indigo, to instantly elevate the visual vibe of your room.

Measuring and Cutting the Pieces
Time for some basic math. Don’t panic, it’s painless. 😉
Decide how large you want your giant floor cushion to be. A standard 36-by-36 inch square offers plenty of room for lounging comfortably.
Always add an extra inch to your measurements for the seam allowance. I use a sharp fabric rotary cutter and a self-healing mat to get perfectly straight lines.
Cut two identical squares for the top and bottom. Next, cut long fabric strips measuring six inches wide for the side gussets. These gussets give your floor pillow that professional, boxy dimension instead of looking like a sad, deflated pancake.

The Secret to Long-Lasting Plumpness
What goes inside matters just as much as the outside. Regular polyester fiberfill works fine, but it flattens out faster than your weekend plans. For a premium, cloud-like experience, I prefer shredded memory foam or a high-density upholstery foam insert. Shredded foam gives you that moldable, sinking feeling, while solid foam maintains a clean, modern shape. Want a genius pro tip? Wrap your foam core in a layer of polyester batting before stuffing it into the cover to ensure everything stays perfectly smooth and lump-free.

Sewing It All Together
Fire up your sewing machine and pin your side gusset strips together to form one long continuous loop. Pin this loop to your top fabric square, matching the raw edges with the right sides facing inward.
Sew along the edges with a sturdy straight stitch. Take your time around the corners to keep them sharp and crisp.
Repeat this exact process for the bottom square. However, remember to leave a generous opening on one side so you can actually turn the cover right-side out and stuff it later. To add extra luxury to your nook setups, consider pairing your new creation with ideas from our velvet throw-pillow combos guide.

The Zipper Hack You Need
Let’s face it: spills happen, especially if you enjoy drinking coffee while reading thrilling mysteries. ☕ Installing a long zipper along one of the side gussets makes your life ten times easier.
A hidden zipper allows you to strip the cover off and throw it in the washing machine whenever disaster strikes. Use a zipper that measures at least three inches shorter than the pillow’s total width. Trust me, spending an extra ten minutes on a zipper now saves you immense frustration down the road.

Master the Art of Tufting
Want to make your DIY project look like an expensive boutique find? Tufting is the ultimate secret weapon. Grab an extra-long upholstery needle and some heavy-duty waxed twine. Cover a couple of large buttons with your leftover fabric. Pull the needle straight through the center of your stuffed pillow from top to bottom, pull it tight to create a deep dimple, and knot it securely under the button. This simple technique prevents the stuffing from shifting over time and adds an instant, sophisticated designer flair.

Styling with Extra Textures
Now comes the incredibly fun part: styling your newly minted floor cushion! One lonely pillow looks a bit sad by itself, so let’s layer up.
I love throwing a waffle-weave blanket or a faux-fur throw over the cushion to invite immediate lounging. Mix up your scales and textures to create visual depth.
Layering elements:
- A chunky knit throw blanket tossed carelessly over the edge.
- Smaller accent pillows in contrasting colors like mustard yellow or sage green.
- A soft, woven jute rug underneath to define the reading zone.

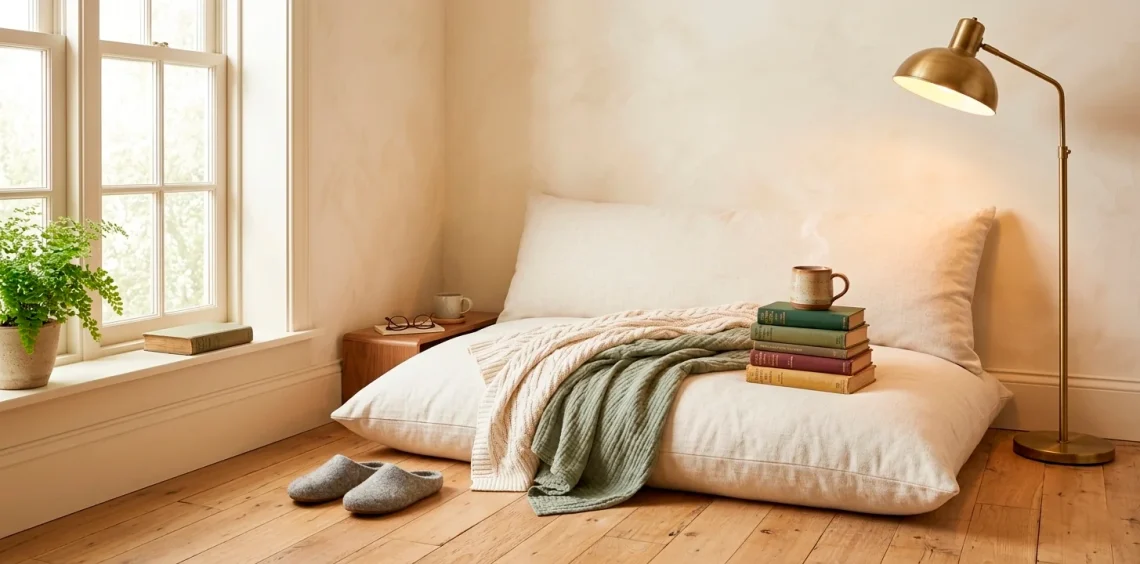
Getting the Lighting Right
Bad lighting completely ruins a great reading session. Nobody wants harsh overhead fluorescent lights glowing while they try to immerse themselves in a fantasy world.
Position a sleek, adjustable brass floor lamp right beside your nook. Choose a warm LED bulb to create a soft, golden-hour glow that keeps eye strain at bay. If you lack floor space, a plug-in wall sconce works absolute wonders while keeping your floor clear for more cushions.

Personalizing Your Secret Hideaway
Final step: make this space completely yours. Bring in a tiny wooden stool or a floating shelf to hold your steaming mug of tea and current read. Add a small potted plant, like a trailing pothos, to breathe life into the corner. IMO, adding personal trinkets or a scented soy candle creates a multisensory escape that practically begs you to unplug and read for hours on end.

Conclusion
You officially have all the tools to design your dream escape. Building a custom floor pillow lets you control the exact size, fabric, and comfort levels of your sanctuary. So, which gorgeous fabric are you grabbing first to start your project? Let me know in the comments below, and happy sewing!