Skip to content
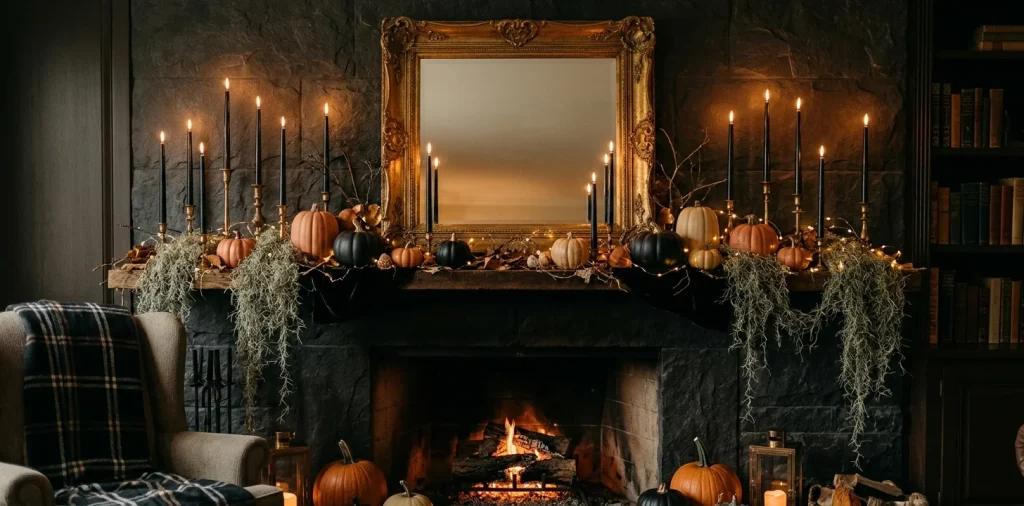
Ready to transform your boring fireplace into a show-stopping spooky focal point? I constantly see flat, lifeless Halloween setups that lack any real visual dimension. You deserve way better than a basic row of plastic pumpkins. Creating a truly professional, designer-level mantel requires mastering one absolute secret weapon: layering heights. Let me walk you through my exact personal process for building a dynamic, richly dimensional display that grabs attention instantly. 🎃
Anchoring the Sturdy Foundation
Every masterpiece needs an incredibly solid base. I always start my mantel design process by placing the heaviest visual elements first. These chunky anchors sit directly on the mantel surface and successfully ground the entire arrangement. Think hefty ceramic pumpkins, dense resin skulls, or heavy cast iron cauldrons. You really need these weighty objects to prevent the display from looking flimsy or top-heavy.
Please do not clump them all together in one spot! Spread these bad boys out evenly across the baseline. This deliberate placement creates absolute visual stability before we even start building upward. Once you establish this sturdy foundation, layering heights becomes infinitely easier and much more intuitive.

Adding Altitude with Candlesticks
Now we need some serious altitude to wake things up.
Tall elements force your eyes to travel vertically across the space. I love using matte black taper candles in brass holders. They immediately add drama and aggressively pull the viewer’s gaze upward. Candlestick styles:
- Tall wrought iron stakes
- Tarnished vintage brass holders
- Sleek matte black pillars
A useful little gift for your home
🎁 Free Plant Finder Tool
Filter 250+ houseplants by 6 smart criteria to find your perfect green companion.
We’ll email you the link. Plus, you’ll join our newsletter!
Mix those heights up vigorously. Staggering tall, medium, and slightly shorter candlesticks effectively prevents that dreaded robotic, uniform look. We want an organic, wild aesthetic, not a stiff retail window display.
Ever wondered why some fireplace mantels look completely flat and boring? They skipped this critical vertical step entirely. Don’t make that rookie mistake.

Bridging the Middle Ground Void
You have your heavy anchors firmly planted and your towering candlesticks reaching high. Now, you must fill the awkward, gaping void between them. The middle ground requires medium-height objects to create a smooth, visually pleasing transition. I usually grab thick vintage books, medium ceramic gourds, or perched black ravens to do this heavy lifting. Stacking old, tattered spell books provides the absolute perfect platform to elevate smaller items and create intricate micro-levels within your display. This genius trick instantly cures the dreaded ‘rollercoaster effect’ where your decorative heights jump too drastically from extremely low to incredibly high. Keep the transition seamless and satisfying.

Trailing and Draping the Edges
We absolutely cannot ignore the mantel’s sharp front edge. A truly dynamic Halloween display actively breaks the horizontal baseline by trailing elements downwards. IMO, a rigid, straight line across the bottom looks way too stiff and artificial.
Drape some creepy cheesecloth, realistic Spanish moss, or a dark botanical leaf garland lazily over the ledge. Let gravity do the hard work for you.
This dramatic downward movement contrasts beautifully with the upward thrust of your tall candlesticks. It actively softens the hard architectural edges of your fireplace and brings the whole spooky scene to life. See my minimalist mantel styling guide for year-round tips.

The Magic Rule of Odd Numbers
Professional designers constantly swear by the magical rule of threes. Grouping decorative items in odd numbers feels so much more natural and pleasing to the human eye. When I arrange a cluster of vintage apothecary bottles or spooky resin figurines, I always group them in threes or fives. Even numbers tend to create a forced, boring symmetry, and Halloween decor basically demands something slightly off-kilter and wild.
Try clustering a tall glass potion bottle, a medium weathered skull, and a tiny plastic spider together on a stack of books. This simple triangular composition is a foolproof design secret that guarantees a polished finish every single time.

Haunting Central Focal Points
Every phenomenal setup needs a clear star of the show.
Anchor your entire mantel design with one massive focal point placed right in the center. An oversized, ornate vintage gold mirror or a giant piece of eerie gothic canvas art works absolute wonders for this.
This central piece dictates the absolute maximum height of your entire display. Ensure absolutely nothing else on the shelf extends taller than this main anchor.
Pro tip: Lean the mirror casually against the wall instead of hanging it permanently. Leaning actively adds physical depth and casts incredibly interesting shadows, plus it saves you from drilling unnecessary holes. Win-win!

Weaving in Spooky Botanicals
Dead florals inject incredible texture and erratic height variations into your arrangement. Forget pristine flower arrangements; we desperately want chaotic, dried, and twisted stems for this look. Placing a heavily tarnished silver vase full of dried eucalyptus, blackened artificial roses, or bare backyard branches adds an organic unpredictability that hard objects simply cannot provide. The wild, sprawling nature of these branches fills empty negative space beautifully while maintaining a wonderfully airy, lightweight feel. Want to carry this botanical vibe elsewhere? Check out my botanical Halloween bathroom decor guide.

Layering Spooky Ambient Glow
You can layer physical heights perfectly, but bad lighting ruins everything.
Harsh overhead room lighting completely destroys the eerie, mysterious mood you just worked so tirelessly to build. I highly prefer using a curated mix of real flickering candle flames and battery-operated amber fairy lights. Weave those tiny, glowing LED strings directly through your Spanish moss and around your anchor skulls.
This brilliant tactic creates warm, glowing pools of light at the base level, while your tall tapers brightly illuminate the upper tier. Multi-level lighting actively highlights your beautifully layered heights instead of flattening them out.

Adding Reflective Metallic Finishes
A completely flat color palette absolutely ruins a dimensional design.
You need reflective surfaces to bounce that spooky candlelight around the room. I love mixing aged metallics directly into the display. Tarnished silver trays, heavily distressed copper mugs, or peeling gold leaf accents catch the ambient light beautifully.
Prop a small, metallic vintage clock right next to a matte black pumpkin. This stark contrast between shiny and dull finishes creates a completely different type of layering—textural depth.
Did you think layering only applied to physical height? Nope! Layering contrasting finishes makes those varied heights pop even more.

The Final Asymmetrical Tweaks
Symmetry puts people to sleep, especially during spooky season. Once you place every single item, take three big steps back and evaluate the entire scene critically. Does it look way too perfect? Mess it up a little! Shift a pumpkin completely off-center or angle a tall candlestick slightly askew.
Your finished mantel should look exactly like a haunted, cursed collection gathered over centuries, not a generic department store window display. Embrace the quirky imperfection because that is exactly what gives your seasonal decor real soul and character.

A useful little gift for your home
🎁 Free Plant Finder Tool
Filter 250+ houseplants by 6 smart criteria to find your perfect green companion.
We’ll email you the link. Plus, you’ll join our newsletter!
Conclusion
Mastering mantel Halloween decor basically comes down to controlling exactly where the eye travels. By intentionally staggering your tall candlesticks, medium botanicals, and low anchoring elements, you craft a dynamic masterpiece instead of a flat mess. The secret lies in those varied heights and embracing a little wild asymmetry. So, which spooky accent are you grabbing first to start building those layers? Let me know in the comments below! 🦇