Skip to content
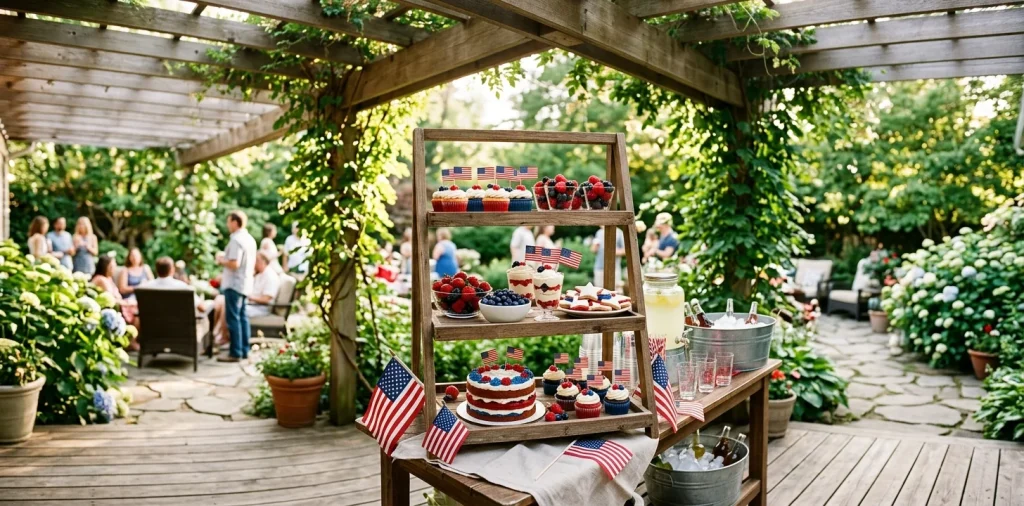
Want to build a dessert display that actually makes your guests stop and stare? I completely ruined my first Memorial Day dessert spread by tossing melted brownies on a flat platter. Never again! Styling a tiered stand gives you that gorgeous vertical drama and saves precious table space. Let me show you exactly how I build mine!
Picking Your Pedestal
You need a solid foundation before we start throwing cupcakes around. I highly recommend grabbing a sturdy three-tier stand over a flimsy plastic one. Wooden or galvanized metal stands instantly scream rustic summer BBQ, and they easily handle heavy traffic.
Ever tried slicing a dense brownie on a wobbly plastic tower? Spoiler alert: it ends in a sugary disaster on your patio. We definitely want to avoid that sticky mess!
Invest in a stand with slight lips on each tray. Those raised edges physically stop loose blueberries from rolling away during a sudden gust of wind. Plus, heavy materials anchor the whole setup against inevitable table bumps.

Base Tier: Grounding the Tower
Start your design at the bottom with the heaviest, sturdiest desserts. I always load the base tier with dense treats like thick fudge brownies, heavy fruit tarts, or chunky patriotic cookies. Placing your heaviest items down low anchors the entire structure and completely prevents embarrassing tipping hazards. You definitely want your guests grabbing these hefty portions without knocking the top tier into the potato salad! IMO, this strategy saves so many outdoor parties from disaster. Throw some fresh strawberry halves into the gaps to fill empty spaces and add an instant pop of classic red! 🍓
A useful little gift for your home
🎁 Free Plant Finder Tool
Filter 250+ houseplants by 6 smart criteria to find your perfect green companion.
We’ll email you the link. Plus, you’ll join our newsletter!

Middle Tier Mixology
Now we hit the sweet spot! The middle tier requires a totally different approach than your hefty base.
I use this specific zone entirely for grab-and-go treats that offer a fun textural contrast.
Think mini cupcakes, vanilla cake pops, or small fruit skewers. You want items that guests can snatch up quickly while holding a cold drink in their other hand. IMO, this tray empties the fastest every single time!
Mix and match the shapes here. Contrast round cookies with square marshmallow treats. Varying your dessert shapes creates instant visual interest and makes the whole spread look like a professional bakery window instead of a basic grocery store haul.

Top Tier: The Crowning Glory
You finally reached the penthouse! The top tier absolutely demands your most visually stunning dessert. I usually feature a small, beautifully decorated focal point here, like an intricate mini-cake, a gorgeous flag-themed tart, or a spectacular star-shaped pastry that commands attention.
Keep the quantity small but the impact huge. Do not overcrowd the top shelf under any circumstances. Give your hero dessert enough breathing room to shine beautifully. You can scatter a few powdered sugar-dusted blueberries around the base, but let that main treat steal the entire show!

Red, White, and Blue Rules
Nailing the patriotic color palette requires a delicate balance. I refuse to use neon artificial food coloring that stains everything. Instead, rely heavily on vibrant natural elements. Fresh raspberries and blueberries bring authentic colors that look appetizing, not radioactive! Try adding bright white yogurt pretzels, powdered donuts, or mini marshmallows for brilliant contrast. You create a much chicer display when you use natural ingredients to represent the holiday colors. It tastes way better, looks incredibly expensive, and saves you from dealing with stained blue teeth in all your party photos!

Textural Touches That Pop
Nobody wants a completely mushy dessert plate. You absolutely must include some serious crunch to balance the soft baked goods!
I always tuck crispy elements strategically between the softer cupcakes and brownies.
Design elements you need to incorporate right now:
- Handfuls of yogurt-covered pretzels
- Clusters of crunchy candied pecans
- Mini honey graham cracker squares
Adding unexpected crunch elevates the entire tasting experience. Guests appreciate the variety, and those fun contrasting textures make your stand look incredibly abundant and thoughtfully curated.

Sneaking in Fresh Fruit
Heavy summer heat absolutely demands refreshing, juicy bites. I always intersperse fresh fruit right on the stand alongside the heavy baked goods. It provides a necessary palate cleanser and visually breaks up the endless sea of beige pastries.
Slice your fruit strategically. Keep strawberry stems attached for a rustic look, and cluster blueberries in small vintage ramekins if your tier has a flat surface. Using small bowls adds another layer of dimension and keeps wet fruit juices far away from your perfectly crispy sugar cookies.

Serving Tools As Decor
We often forget the practical stuff! Serving tools serve a dual purpose when you style them correctly and intentionally.
Buy cute miniature metal tongs or tiny wooden serving spoons.
Tie a small red or blue ribbon around the handles of your tongs. You instantly turn a boring utensil into a totally cohesive, festive design element.
Just lay them casually on the bottom tier. Accessible tools encourage guests to serve themselves neatly without destroying your beautiful arrangement. If you are upgrading your whole outdoor kitchen setup, check out this excellent guide on the essential gear for a home chef’s backyard kitchen.

Pest Protection That Looks Good
Let us address the buzzing elephant in the backyard. Flies and wasps love your dessert stand just as much as your little cousins do! I totally ditch those ugly plastic wrap covers that ruin the aesthetic. Instead, grab an elegant mesh food dome. You can find gorgeous wire or bamboo cloches that completely match your rustic outdoor stand. A stylish mesh cover protects your hard work while keeping the delicious treats perfectly visible and appetizing. You worked way too hard on that presentation to hide it under sad, clingy plastic wraps!

Table Placement Masterclass
Location matters just as much as the beautiful desserts themselves. Never place your magnificent tiered stand directly in the glaring afternoon sun.
I always position my dessert stand under the main patio umbrella or safely beneath a shaded pergola. Melting chocolate fountains belong in romantic comedies, not melting all over your lovely backyard deck! 😅
Place the stand at the very end of your buffet line. Positioning desserts at the end builds great anticipation and ensures guests grab their main courses first. Want to define that serving zone beautifully? You can easily choose the right outdoor rug for your summer porch to ground the entire space.

A useful little gift for your home
🎁 Free Plant Finder Tool
Filter 250+ houseplants by 6 smart criteria to find your perfect green companion.
We’ll email you the link. Plus, you’ll join our newsletter!
Conclusion
Building an epic Memorial Day dessert stand simply requires a little strategy and a lot of fresh fruit. You ground the base, create a fun middle zone, and crown it with a showstopper! Your guests will absolutely devour these treats while praising your incredible styling skills. Which dessert are you placing on the top tier? Let me know in the comments!