Skip to content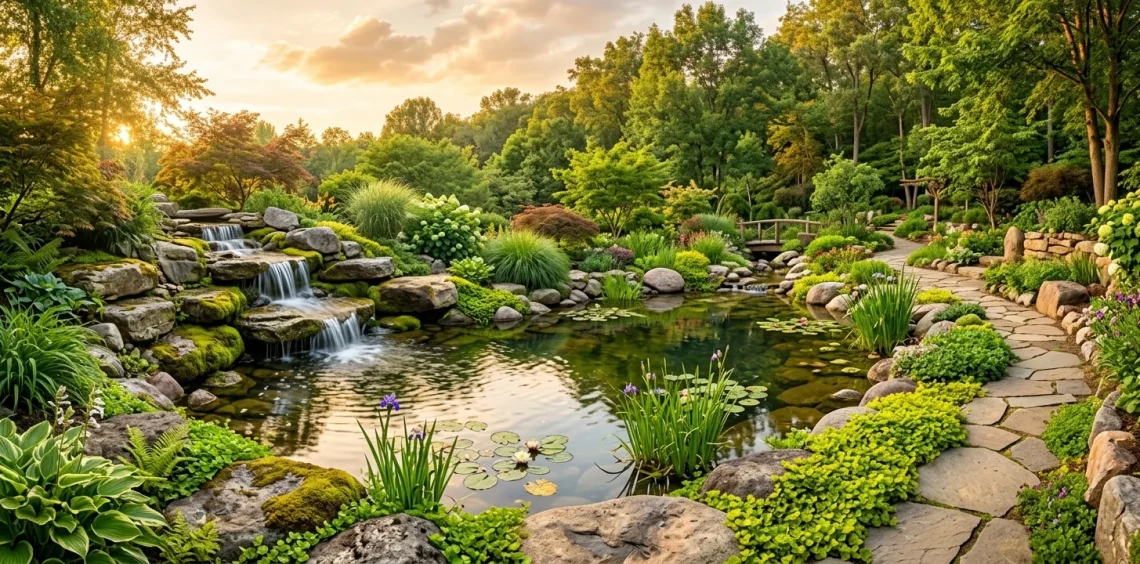
Ever look at your pond and think it looks a bit too… man-made? We have all been there. Placing rocks around a water feature sounds incredibly simple until you actually start hauling them around. I completely ruined my first water garden by lining up identical stones like a string of pearls. Let’s save your back and build a truly natural oasis together.
The Infamous “Rock Necklace” Mistake
Why do we always default to lining up rocks in a perfect little circle? It is the most common pond mistake out there, and frankly, nature just does not work that way. When you place uniform stones single-file around the edge, it screams artificial and completely kills the vibe. You want your water feature to look like ancient glaciers carved it, not like a bored contractor quickly assembled it. Break the ring immediately. Group your stones organically, overlapping some and leaving deliberate empty spaces for planting. It makes an incredible world of difference!

Choosing the Right Rock Families
Grabbing whatever random stones you find on sale at the garden center usually ends in a chaotic, messy look. You need a cohesive, well-thought-out plan.
I always tell people to pick one primary type of rock and stick to it religiously. If you mix jagged gray slate with smooth tan river rock indiscriminately, the design gets incredibly confusing. Nature usually deposits one specific type of stone in a single geological area, and mimicking that is key.
A useful little gift for your home
🎁 Free Plant Finder Tool
Filter 250+ houseplants by style, size, and care level to find your perfect green companion in seconds.
We’ll email you the link. Plus, you’ll join our newsletter for fresh home inspiration.
Keep it simple and stock up on the essentials. Pond rock essentials:
- Boulders: Your massive, eye-catching anchor points.
- Cobblestones: Medium pieces for transitions and filling gaps.
- Gravel: The tiny stuff for the pond floor and finishing touches.

The Golden Rule of Three
Ever wondered why some rock formations look effortlessly stunning while others look awkwardly staged? It all comes down to the magic of odd numbers. Our human brains naturally search for symmetry, but perfect symmetry looks incredibly fake in an outdoor setting.
Try grouping your heavy anchor boulders in clusters of three, five, or even seven. Never place two identical rocks right next to each other. I usually drop one massive boulder first, then tuck a slightly smaller medium stone against its side, and finish with a tiny one slightly off-center. It instantly creates that rugged, weathered appearance we all crave.

Building a Believable Waterfall
Waterfalls are undeniably the crown jewel of any backyard pond design.
But slapping a few flat rocks together and pumping water over them just creates a sad, splashy mess that nobody wants to look at. You really need to study how water actually carves its way through a natural landscape.
Always frame your waterfall. Use your absolute largest, most intimidating boulders on the extreme left and right sides of the drop. These heavy “framing rocks” force the rushing water to funnel beautifully over your chosen spillway stone.
I highly recommend tilting the main spillway rock slightly backward. It sounds completely counterintuitive, but it actually creates a thicker, much more dramatic sheet of water instead of a messy, unpredictable trickle.

Concealing the Dreaded Black Liner
Nothing shatters the illusion of a pristine natural spring quite like a shiny rim of black EPDM liner peeking out into the sunlight. Hiding this ugly rim is absolutely non-negotiable if you want a professional look.
Creating a sturdy rock shelf just below the water level is your best defense. Stack flat stones on this submerged ledge so they break the surface naturally. Then, pile plenty of gravel right behind them to cover every single exposed inch of liner. Honestly, this step takes serious patience and ruins a few fingernails, but the seamless, invisible transition from earth to water is entirely worth the backache!

Playing with Elevation and Depth
Flat landscapes bore the eyes completely. If every single rock sits at the exact same height, your pond will lack dramatic dimension and end up looking like a kiddie pool.
Partially bury your largest boulders. A giant rock sitting completely on top of the soil looks like an alien spacecraft that just landed awkwardly in your yard. Dig a shallow depression and sink the bottom third of the heavy stone directly into the damp earth.
It anchors the entire feature. It immediately gives the striking illusion that the rock has rested there for centuries, while the earth slowly swallows it.

Softening the Hard Edges
Rocks are incredibly heavy and visually aggressive on their own. You absolutely must soften them with lush, vibrant vegetation to bring the space alive. Creeping Jenny, aquatic mint, and various rich green mosses are your absolute best friends here. Stuff them directly into the tight crevices between your stacked boulders. As they grow, they naturally cascade over the rough stone surfaces, blurring the harsh lines and tying the entire delicate ecosystem together. IMO, a pond without sprawling edge plants is just a wet rock quarry masquerading as a garden.

Designing Safe Havens for Your Fish
We absolutely cannot forget about the actual swimming residents of your beautiful new pond.
Delicate Koi and colorful goldfish desperately need safe, dark spaces to hide from local predators like hungry raccoons and hunting herons.
When placing your submerged rocks, intentionally create deep caves and protective overhangs. I personally like to balance a massive, flat slab across two sturdy base rocks right at the very bottom of the pond.
It gives the fish a highly secure retreat. Plus, these underwater architectural structures add fascinating dark voids that make your pond look infinitely deeper and more mysterious.

The Magic of Nighttime Illumination
Your exhaustive hard work should not just disappear the second the sun goes down. Strategic, warm lighting completely transforms a heavy pile of rocks into a dramatic, glowing nighttime sanctuary.
Hide waterproof LED spotlights carefully behind small accent rocks, aiming them directly at your cascading waterfall or the highly textured face of your largest boulder. The dramatic shadows created by the jagged stone surfaces look absolutely spectacular at night. Check out these dramatic tree uplighting ideas for your backyard.

Step Back and Squint
When you stare intensely at the exact same patch of gravel for three straight hours, you lose all logical perspective.
Take frequent, necessary breaks. Walk completely to the other side of your yard, turn around, and squint hard at your pond. Squinting magically removes the distracting tiny details and lets you accurately see the overall bulky shapes and heavy balance of your rock placement.
If one side looks strangely heavy or a particular boulder draws way too much attention, move it immediately. Trust your gut instinct and adjust it!

Securing Everything in Place
Loose rocks are incredibly dangerous near a slippery water source. Once you finally find the absolutely perfect layout, you need to lock it down securely. Use black expanding pond foam to fill all the hidden voids between your main waterfall rocks. It not only glues the heavy stones together but also tightly forces the rushing water to flow boldly over the rocks instead of silently sneaking underneath them. FYI, definitely wear tough gloves when handling that foam—it absolutely ruins manicures and sticks to your skin for days! 😅

Letting Nature Take the Wheel
Your pond will probably look its absolute worst the exact day you finish it. Everything is way too clean, the water might be quite muddy, and your expensive plants are still tiny.
Give it plenty of time. Let the green algae grow naturally on the submerged cobblestones. Let the harsh weather slowly fade the fresh, bright scratches on your heavy boulders. Nature is the ultimate master artist. Your only real job is to simply provide a structurally sound canvas and bravely step out of the way.

A useful little gift for your home
🎁 Free Plant Finder Tool
Filter 250+ houseplants by style, size, and care level to find your perfect green companion in seconds.
We’ll email you the link. Plus, you’ll join our newsletter for fresh home inspiration.
Conclusion
You did it! Designing a natural-looking pond takes a bit of sweat, some heavy lifting, and a lot of patience, but the results are entirely worth it. Throw out the cookie-cutter templates, embrace the rugged asymmetry of nature, and enjoy your beautiful backyard oasis. What is the very first fish you plan to add to your new masterpiece? Let me know in the comments!