Skip to content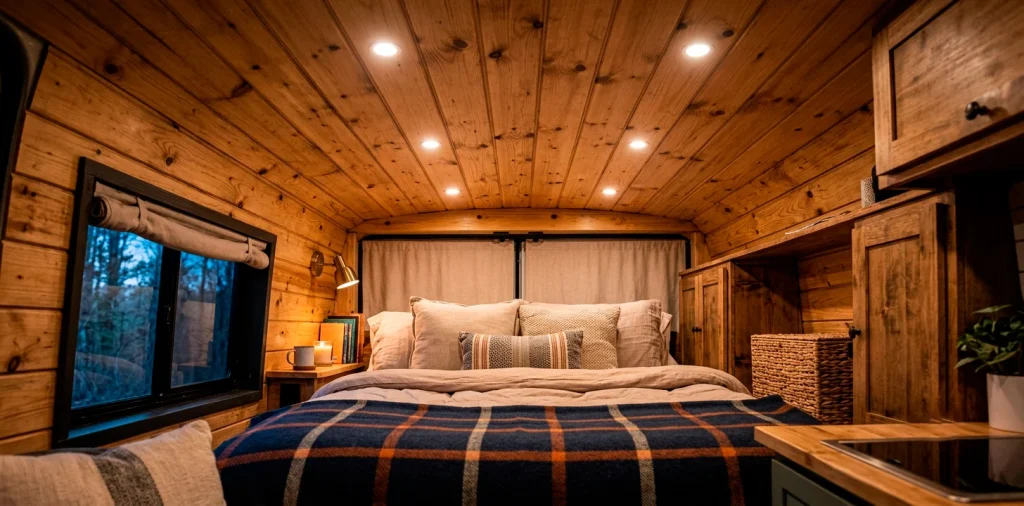
Look up at that bare metal van roof. Intimidating, right? I stared at mine for weeks before making a move. Building a tongue-and-groove van ceiling completely transforms your tiny home on wheels from a cargo tin can into a cozy rolling cabin. Grab your tape measure, because I am showing you exactly how to tackle this build without losing your mind.
Picking the Perfect Planks
Choosing the right wood dictates the entire vibe of your build. I strongly recommend lightweight woods like cedar or pine. Heavy hardwoods weigh down your rig and guzzle your gas mileage.
Cedar smells absolutely incredible, but pine fits a tighter budget perfectly. I went with knotty pine for my build because I love that rustic, cabin-like charm. Pick planks that look straight; warped boards turn installation into a wrestling match!

Gathering Your Arsenal
You cannot build a masterpiece with dull tools. Period.
Before you start ripping boards apart, organize your workspace. I learned this the hard way after losing my pencil fourteen times in one hour. Trust me, a chaotic van floor kills your momentum fast.
A useful little gift for your home
🎁 Free Plant Finder Tool
Filter 250+ houseplants by style, size, and care level to find your perfect green companion in seconds.
We’ll email you the link. Plus, you’ll join our newsletter for fresh home inspiration.
Must-have tools:
- Brad nailer
- Jigsaw and miter saw
- Construction adhesive
- Scribe tool
Invest in a decent battery-powered brad nailer. Corded tools inside a metal van create a frustrating obstacle course you simply do not need. FYI, I highly recommend 18-gauge brad nails for maximum holding power.

Do Not Skip Insulation
Ever slept in an uninsulated van during winter? It feels exactly like sleeping inside a refrigerator. Before you even think about installing beautiful wood, you must insulate that metal roof properly. I prefer Havelock wool because it handles moisture effortlessly, but XPS foam board works beautifully too. Stuff every single crevice to block out road noise and trap heat. You only get one chance to insulate your ceiling, so do not take shortcuts here! A well-insulated van keeps you sane during hot summer days and freezing desert nights.

Screwing Up Furring Strips
Furring strips act as the skeleton for your tongue-and-groove planks. You cannot nail wood directly to the thin metal van roof without piercing the exterior.
I use plusnuts to secure my 1×2 wooden furring strips to the metal ceiling ribs. Self-tapping screws work in a pinch, but plusnuts provide superior strength that withstands intense road vibrations. Apply a dab of threadlocker to keep everything locked tight.
Run these strips perpendicular to your final plank direction. Always leave a small gap between the wood and metal to prevent annoying squeaks while driving.

Wiring the Heavens
Lighting completely makes or breaks your van interior. Plan your puck light layout right now, before you start covering the ceiling. I prefer a simple grid of six dimmable LED puck lights for a cozy, versatile glow. Sketch a quick diagram and mark your furring strips so you remember exactly where each light goes.
Run all your electrical wires alongside your furring strips. Secure them tightly with zip ties so they stay exactly where you need them. I always leave a few extra feet of wire dangling at each light location. You definitely want that wiggle room later when you connect the fixtures! 💡

Making the First Cut
The first plank sets the stage for the entire ceiling. Measure the center line of your van from front to back, and snap a chalk line to guide you. Vans rarely feature perfectly square walls, so never trust the edges. Start your installation dead center and work your way outward. This strategy guarantees a beautifully symmetrical ceiling layout. Measure twice, cut once, and secure that first board with absolute precision. Apply a generous bead of construction adhesive along the furring strips before firing your brad nails. If that center plank goes on crooked, your entire ceiling looks like a funhouse mirror.

The Interlocking Dance
Now the real fun begins.
Slide the tongue of your second board right into the groove of the first. You might need a rubber mallet to gently persuade stubborn boards into place.
Do not Hulk-smash the wood! A gentle tap usually does the trick. I use a scrap piece of wood as a tapping block to protect the delicate tongue from my mallet strikes.
Fire brad nails through the tongue at a 45-degree angle so the next board hides the nail heads completely. This technique creates a flawless, fastener-free finish that looks incredibly professional. Just keep repeating this interlocking dance across the ceiling.

Navigating the Dreaded Curves
Vans curve. Wood generally hates curving. This natural conflict causes the most headaches during a DIY camper build.
When you reach the edges where the roof meets the walls, the curvature gets aggressive. You must scribe your final boards to match the van wall contour perfectly. Grab a compass, trace the uneven wall shape onto your wood, and carefully cut along that line with a jigsaw. It takes immense patience, but the final flush fit feels incredibly satisfying.

Stains, Seals, and Splinters
Bare wood looks great, but van life brings serious humidity and moisture. You need a solid protective topcoat.
I highly recommend sealing your ceiling boards *before* you install them. Staining wood upside down inside a cramped van guarantees a messy, sticky disaster. IMO, a clear matte polyurethane protects the wood beautifully while keeping the natural bright tone intact.
Sand every single board with 220-grit sandpaper until it feels silky smooth. Give it two coats of sealant, and gently sand between coats. You absolutely want to avoid snagging your favorite sweater on a rogue ceiling splinter later!

Final Trim and Cleanup
You nailed the last board, but the job lacks that final polished look. The edges where your ceiling meets your walls probably look a bit rough. Do not panic! Simply cut and install a sleek trim piece or corner molding to hide those awkward gaps. Cut out the holes for your puck lights using a hole saw, fish those wires through, and snap your lights into place. Sweep out the massive pile of sawdust, stand back, and admire your handiwork. You just built a stunning wooden ceiling that completely elevates your van. It truly transforms the space.

A useful little gift for your home
🎁 Free Plant Finder Tool
Filter 250+ houseplants by style, size, and care level to find your perfect green companion in seconds.
We’ll email you the link. Plus, you’ll join our newsletter for fresh home inspiration.
Conclusion
Building a beautiful tongue-and-groove van interior ceiling requires patience, the right tools, and a bit of sweat. But seeing that gorgeous wooden canopy above your bed makes every single challenge worthwhile. You now have a cozy, customized sanctuary ready for the open road. Are you tackling the ceiling or the floors next? Let me know in the comments!