I absolutely love the cozy, rustic vibe a dried orange garland brings to a room. Forget those flashy plastic decorations from the big box stores. You can easily make this timeless, fragrant accent right in your own kitchen! It fills your home with the most amazing citrus scent and instantly adds an authentic, old-world charm to any space. Ready to create some magic?
The Magic of Nostalgic Citrus Decor
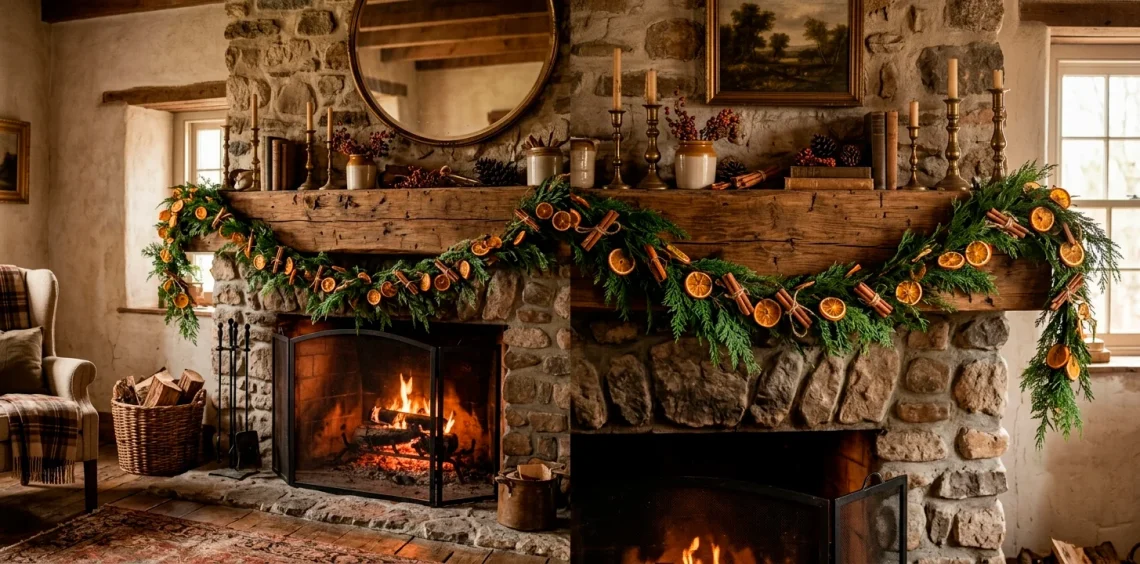
Have you ever wondered why we are so obsessed with bringing nature indoors? I think it traces back to simpler times when folks actually relied on what they grew. Adding a dried fruit garland to your mantel instantly transports you to a cozy, nineteenth-century cottage. The sheer beauty of natural textures completely transforms a plain room into a warm sanctuary.
You get this gorgeous, translucent stained-glass effect when the sunlight hits those orange wheels just right. Plus, it smells incredible! Your kitchen will smell like a rustic bakery for days. I bought a pre-made one once, and it honestly looked like sad, shriveled potato chips. Making it yourself guarantees that vibrant, rich color we all crave.

Gathering Your Crafting Arsenal
You honestly don’t need much to pull this off, which is the best part! Grab four or five firm navel oranges, a very sharp serrated knife, some thick jute twine or floral wire, and a large tapestry needle. I highly recommend picking up some whole cloves, cinnamon sticks, or even wooden beads if you want to elevate the look. A sharp knife makes a massive difference here, FYI. If you use a dull blade, you will just squish the fruit and end up with a juicy mess on your cutting board. Trust me, nobody wants a mangled orange slice on their beautiful holiday mantel! Always use firm fruit because older, mushy oranges simply refuse to slice cleanly.

Slicing Like an Absolute Pro
Let’s tackle the most crucial step. You must cut your slices to exactly a quarter-inch thickness.
Too thick, and they take three business days to dry. Too thin, and they turn into crispy, burnt little frisbees in your oven.
I usually discard the end pieces because they hold too much moisture and look a bit weird anyway. You want those beautiful, symmetrical starburst patterns right in the center.
Once you slice them all, grab a paper towel and firmly pat both sides of every single piece. Removing that excess surface moisture speeds up the baking process immensely and prevents annoying curling edges.

The Baking Process: Low and Slow
Now, preheat your oven to 200°F (or 90°C). Line a large baking sheet with parchment paper to prevent sticky disasters. Lay your beautiful slices flat, making sure they do not overlap at all. You need good airflow! Pop them in the oven and prepare to practice some serious patience. You will bake these little beauties for about two to three hours. I always flip my slices every 30 minutes to ensure they dry evenly on both sides. Keep a close eye on them during that final hour, because they can go from perfectly dehydrated to slightly charred incredibly fast.

The Patience Game and Drying Checks
How do you know when they are truly done? The slices should feel completely dry to the touch and slightly pliable, but definitely not sticky.
If they still feel tacky, leave them in the oven for another twenty minutes. You really do not want any lingering moisture, or you risk growing mold later on.
Once you pull them out, transfer them directly to a wire cooling rack. I usually leave mine sitting out overnight just to be absolutely certain they dry completely. This extra waiting period locks in that perfect, slightly stiff texture you need for stringing.

Stringing It All Together
Thread your large tapestry needle with your jute twine or thick cotton thread. Push the needle straight through the fleshy part of the orange, just inside the rind. I usually go in one side and out the other to keep the slice lying perfectly flat.
You can space them out evenly, leaving a few inches between each slice, or bunch them tightly together for a totally different, abundant look. I personally love mixing up the spacing to give it a more organic, handmade feel. If the slices try to slide around on the twine, just tie a tiny knot right behind each one to lock it firmly in place.

Adding Extra Old-World Elements
Want to take this project to the next level? You should definitely mix in some extra natural textures.
Classic natural additions:
- Whole cinnamon sticks
- Raw wooden beads
- Dried bay leaves
- Small foraged pinecones
I always tie a cinnamon stick horizontally between every third orange slice using a bit of brown floral wire. It breaks up the visual pattern beautifully and adds another rich layer of nostalgic scent to the room.
You can also string raw wooden beads directly onto the twine between the fruit. This small detail truly cements that vintage, pioneer-style aesthetic we are aiming for!

Styling Your Masterpiece
Now comes the fun part! You can drape your finished garland over a mantel, wrap it around a banister, or even frame a cozy kitchen window. I love weaving mine through fresh cedar or pine branches for that ultimate lush, woodland contrast. The bright, earthy orange against dark green needles looks incredibly striking.
Avoid hanging it in direct, glaring sunlight for prolonged periods, as the colors will eventually fade. Drape it casually to highlight those beautiful natural imperfections. IMO, this completely elevates your space, especially if you pair it with some vintage brass fireplace accessories.

Preservation and Long-Term Storage
Can you keep this garland for next year? Absolutely! If you dried the slices properly, they will easily last several seasons. I store mine in a simple cardboard box nestled in tissue paper. Never store dried fruit in an airtight plastic container! Any trapped residual moisture will create a tragic, fuzzy science experiment in your attic. A breathable box allows any remaining moisture to escape safely. While the citrus scent definitely fades over time, the beautiful dark amber color actually deepens and looks even more authentically vintage the second year you hang it up.

Why Bother Making Your Own?
You might ask yourself why you should spend three hours drying fruit when you can buy a plastic version online. Honestly, the experience itself holds half the magic.
Taking a slow afternoon to craft something beautiful with your hands grounds you. It forces you to slow down, appreciate the little things, and fill your home with intention rather than mass-produced clutter.
Plus, the bragging rights are pretty fantastic when guests ask where you bought such a gorgeous piece! You can proudly tell them you made it from scratch. It really is an essential skill when mastering the art of layering neutrals in your holiday decor.

Conclusion
Crafting a dried orange garland is honestly one of the most rewarding, simple DIYs you can tackle. It brings so much warmth, character, and incredible fragrance into your home. Grab some oranges this weekend, turn on your favorite playlist, and start slicing! Are you planning to hang yours on the mantel or in the kitchen? Let me know in the comments!