Stop settling for plastic party store junk that looks like it survived a basement flood. Your St. Paddy’s decor deserves a glow-up that doesn’t scream ‘freshman year frat party.’ I’ve spent enough time elbow-deep in chalk paint to know that a humble jar can transform your mantle from ‘meh’ to ‘Irish-ish’ in twenty minutes. Ready to ditch the tacky tinsel and get crafting with me? Let’s make something your guests will actually want to steal 🍀.
The Gold-Dipped Leprechaun Look
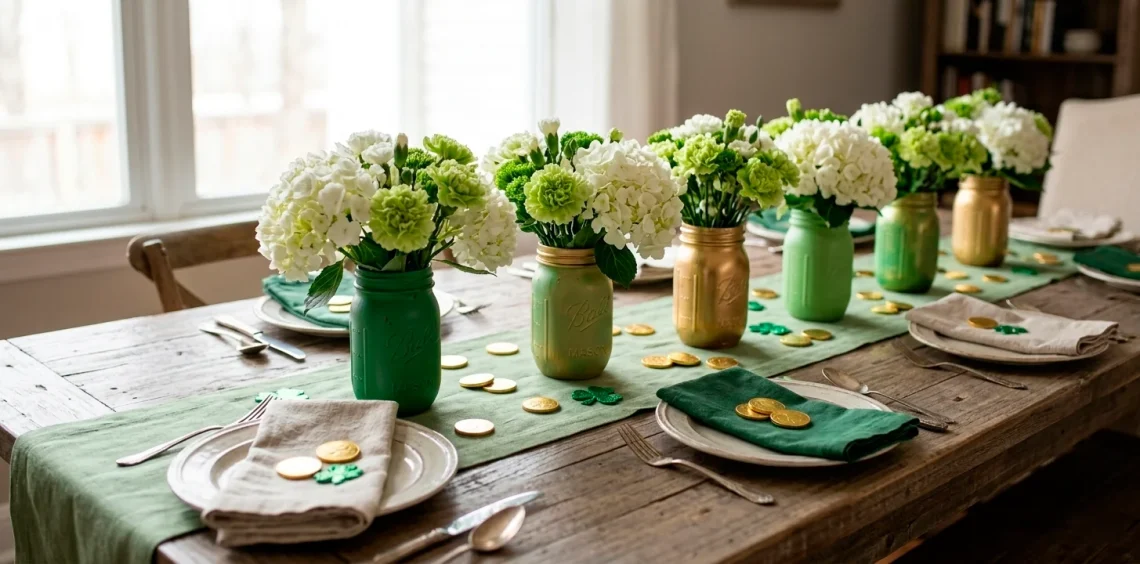
I honestly think nothing beats the combination of metallic gold and deep emerald. It feels expensive, even if the jar originally held pickles. You start by spray-painting the bottom third of the jar with a high-shine gold, then let it dry before layering on the green paint. Ever noticed how a little metallic pop makes everything look intentional? I usually use painter’s tape to get that crisp, clean line because my hands shake more than a leaf in a gale.
Essential materials for this project:
- Metallic gold spray paint
- Emerald green acrylic paint
- High-quality painter’s tape
- Matte sealant spray
- Wide-mouth 32oz mason jars
You really want to stick with a matte green to let the gold shine. I made the mistake once of using glossy green and it looked like a literal toy truck. Keep it classy, IMO. If you want a more natural vibe for your home, you might like these stunning green powder room ideas for an earthy feel.

Distressed Sage Farmhouse Aesthetic
If you aren’t obsessed with the distressed look yet, are you even a crafter? This one is for my folks who love that ‘found it in a barn’ vibe but don’t want actual barn spiders in their living room. I grab a bottle of sage green chalk paint—which sticks to glass like glue—and cover the whole jar. Once it dries, I take a piece of fine-grit sandpaper and go to town on the raised lettering. It highlights the ‘Mason’ brand name perfectly and gives it that lived-in, cozy soul. Why buy expensive vintage glass when you can just fake it in ten minutes? I find that sage green looks much more sophisticated than a bright ‘clover’ green, especially if you’re keeping these out past March 17th.

The Glitter Bomb Pot of Gold
Okay, look, I know glitter is the herpes of the craft world, but it’s St. Patrick’s Day! If you can’t sparkle now, when can you? I suggest using a heavy-duty decoupage glue like Mod Podge to coat the inside of the jar. This keeps the glitter contained so it doesn’t end up in your hair for the next three years.
I pour a generous amount of chunky gold glitter inside, shake it like a Polaroid picture, and let it dry upside down.
Does it look extra? Yes.
Is it glorious under fairy lights? Absolutely. It mimics a literal pot of gold and makes the perfect vessel for those yellow carnations that everyone pretends to hate but actually loves. Just don’t blame me when you find a stray sparkle on your dog’s nose tomorrow.

Shamrock Silhouette Cutouts
This technique uses negative space to make a statement, and I love it because it looks way more technical than it actually is. You just stick a shamrock-shaped sticker onto the glass, paint the entire jar a solid color, and then peel the sticker off while the paint is still slightly tacky. You’re left with a perfectly clear window in the shape of a leaf! It’s like magic, but with more sticky fingers. I usually put a tea light inside instead of water so the shamrock glows when the sun goes down. Seriously, who needs a rainbow when you have a backlit clover? It’s a great way to add a subtle holiday nod without going overboard on the green overload.

Ombre Green Gradient Jars
Why settle for one shade of green when you can have five? I start with a dark forest green at the base and slowly blend it into a minty white at the top. It reminds me of the rolling hills in Ireland, or at least how I imagine them after a couple of Guinnesses.
The trick here involves:
- A damp makeup sponge for dabbing
- Three shades of green acrylic paint
- A bottle of white paint for blending
I dab the colors where they meet to get that smooth transition. If you mess it up, just call it ‘abstract art’ and move on. No one is checking your blending skills with a magnifying glass! It’s a very modern take on the holiday that fits perfectly in a minimalist home.

Rustic Burlap and Lace Wraps
For those who find paint a bit too messy—I see you, and I respect your clean carpet—fabric wraps are the way to go. I take a wide strip of natural burlap and hot glue it around the middle of a clear jar. Then, I layer a thinner strip of white lace or a green ribbon right over the center. It gives off a very ‘Celtic wedding’ vibe that’s super charming on a breakfast nook table. I think the texture of the burlap against the smooth glass is just chef’s kiss. Plus, if you get tired of the St. Paddy’s theme, you just rip the ribbon off and swap it for something else. Efficiency is my middle name, FYI.

The Buffalo Plaid Luck
Buffalo plaid isn’t just for Christmas anymore, and I’m here to advocate for its year-round dominance. I use thin strips of electrical tape or washi tape to create a grid on a green-painted jar, then hit it with a darker shade of green. When you peel the tape back, you get this gorgeous, preppy plaid pattern that looks like it belongs in a high-end boutique.
Placing these on a mantle adds a nice structured element to an otherwise organic flower arrangement.
- Paint the base light green.
- Apply horizontal and vertical tape lines.
- Paint over everything with dark green.
- Peel and reveal the magic.
You can easily blend this style into a larger room theme. If you love mixing patterns, check out these tips for how to layer creams and beiges in a modern farmhouse setting to balance the bold plaid.

Polka Dot Party Vases
Sometimes you just want something that looks happy, and nothing says ‘party’ like polka dots. I use the eraser end of a pencil as a makeshift stamp to get those perfectly round circles. I usually go for white dots on a green jar or gold dots on a white jar. It’s incredibly therapeutic to just sit there and stamp away while listening to a podcast. Ever tried ‘dot therapy’? It’s cheaper than a real therapist and you get a vase out of it. I love how these look when they are grouped in a cluster of three. Use different sized jars to create some height variety and make your centerpiece look more professional.

Rainbow Ribbon Cascade
We can’t talk about St. Patrick’s Day without acknowledging the rainbow. Instead of painting the jar, I like to tie various shades of silk ribbon around the neck and let them hang down like a colorful waterfall. It’s a great way to add movement to your decor, especially if there’s a slight breeze from an open window.
I recommend using these colors:
- Cherry red
- Zesty orange
- Sunny yellow
- Grass green
- Royal blue
- Deep violet
It’s low effort but high impact. I honestly think it’s the best project for kids or for anyone who is currently ‘craft-challenged.’ You just need a pair of scissors and some decent knot-tying skills. It turns a boring jar into a vibrant celebration instantly.

The Penny-Pinching Lucky Jar
Did you know that pennies are technically ‘lucky’? I decided to lean into that by gluing actual pennies to the outside of a mason jar in a scale-like pattern. It creates this heavy, copper, industrial look that is surprisingly chic. I finish it off with a green ribbon tied around the top to bring in the holiday theme. It’s a bit time-consuming, but the result is a heavy-duty piece of decor that looks like a custom metalwork item.
I usually use E6000 glue because it doesn’t mess around when it comes to holding metal to glass. Just make sure you do this in a well-ventilated room, or you might start seeing leprechauns that aren’t actually there. It’s the ultimate ‘upcycle’ that uses that loose change you have rolling around in your car’s cup holder.

Ready to Get Lucky?
You don’t need a pot of gold at the end of a rainbow to have a beautiful home this March. Whether you go for the glitter bomb or the sophisticated sage, these mason jar DIYs prove that a little paint and some spare time go a long way. So, which of these lucky vases are you going to tackle first? Let me know in the comments, and don’t forget to share your finished masterpieces with me! Happy crafting, friends ☘️.